
In my previous article, I introduced Document Vector Store—a way to bring any PDF, Markdown, or text file into your AI workflows. Today, we're taking a completely different approach: event-driven automation.
Instead of pulling knowledge from documents, we're going to build workflows that respond to things happening in your GitHub repositories in real-time.
Why GitHub Event-Driven Workflows Matter
Think about the repetitive tasks that happen every time someone opens an issue or creates a pull request:
- Triaging new issues
- Providing initial context or supplementary information
- Reviewing code changes
- Generating PRDs from feature requests
- Updating documentation when code changes
With Giselle's GitHub Trigger and Action nodes, you can automate all of these. And here's where it gets really powerful: combine this with GitHub Vector Store that I covered earlier, and you can build workflows that analyze incoming issues or pull requests against your existing codebase.
Imagine an AI that not only reviews a PR's diff but also understands how those changes relate to the rest of your code. That's the kind of agentic, practical workflow you can build—without writing a single line of code.
Let's start with something simpler to understand the fundamentals.
Tutorial: Building an Auto-Responding Issue Assistant
We'll build a workflow that:
- Triggers when a new issue is created
- Analyzes the issue's title and body
- Researches supplementary information using web search
- Automatically posts a helpful comment back to the issue
Step 1: Setting Up the GitHub Trigger Node
First, add a GitHub Trigger node to your canvas. This node is the starting point of your event-driven workflow.
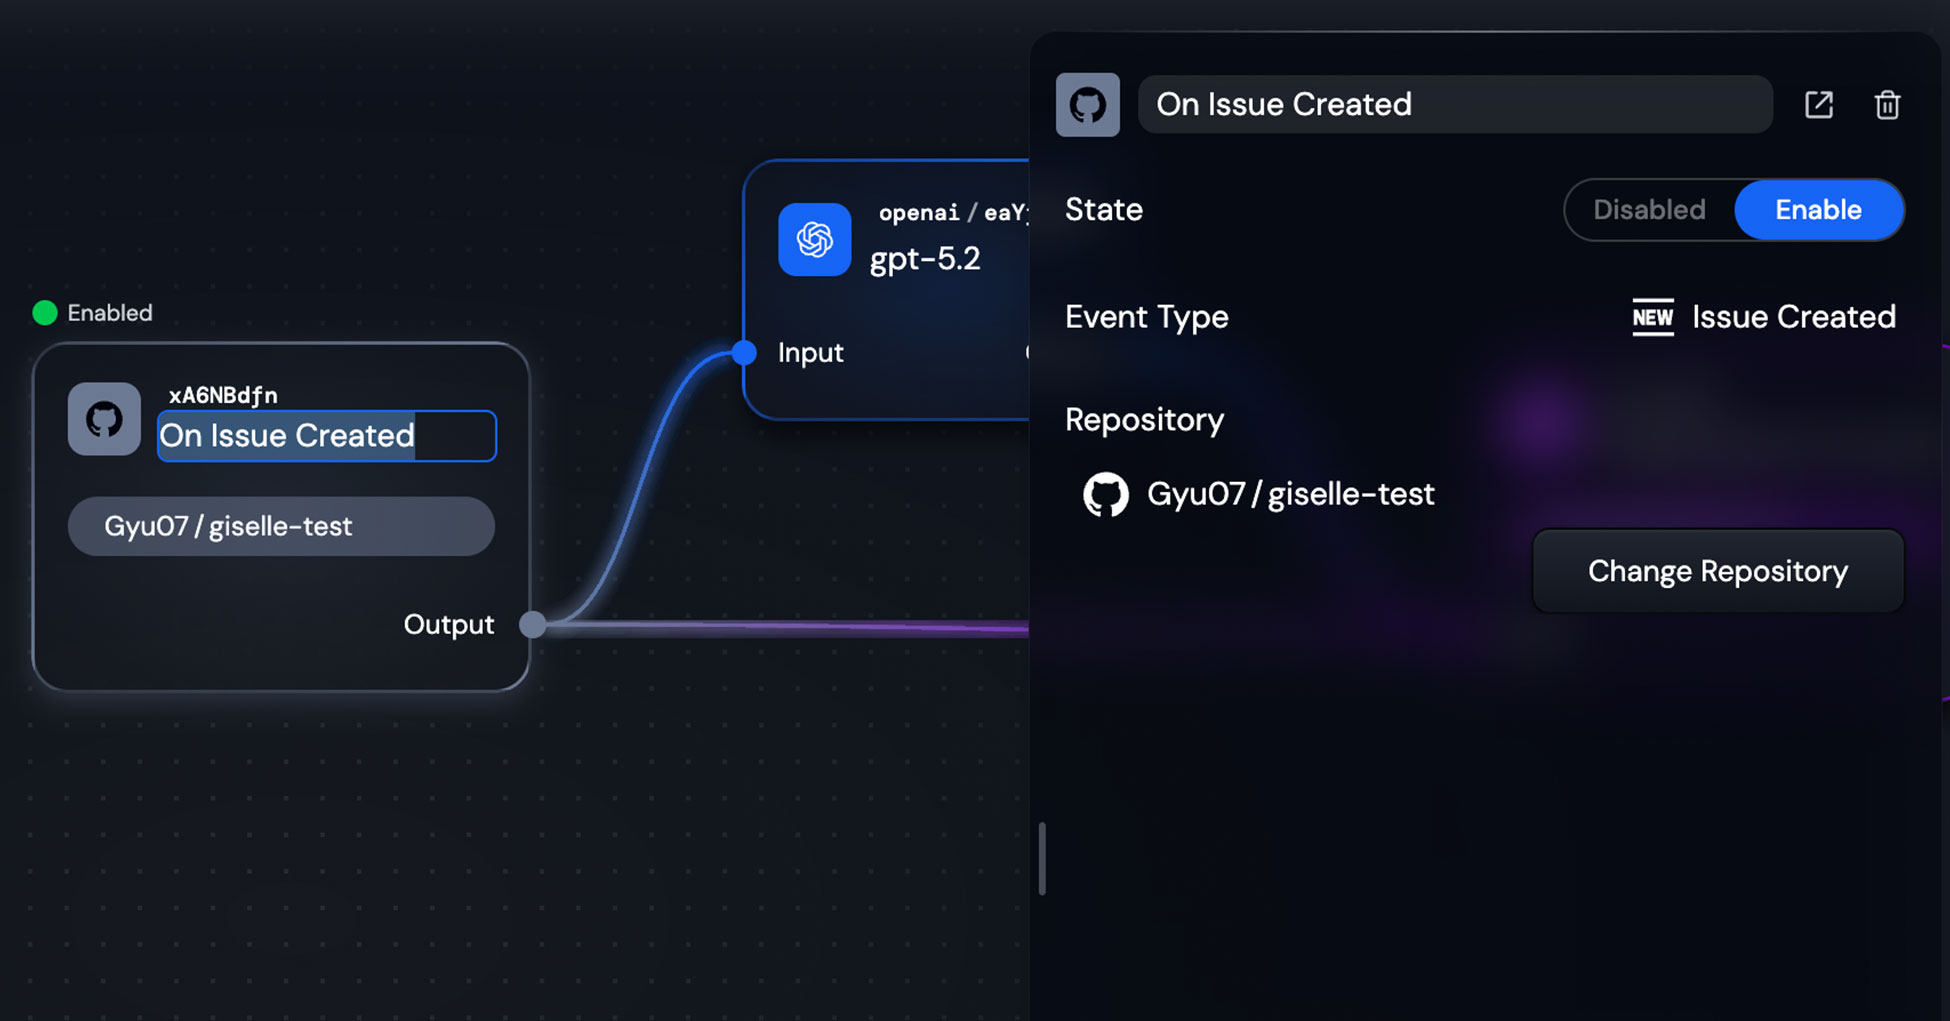
When you add a Trigger node, you'll need to configure three things:
- Select your GitHub account/organization — Choose where your target repository lives
- Choose a repository — Select the repo you want to monitor (you can configure repository access in Integrations)
- Set the event type — Pick what triggers the workflow
Giselle supports a variety of trigger events:
- Issue Created / Closed / Labeled
- Issue Comment Created
- Pull Request Opened / Closed / Labeled / Ready for Review
- Pull Request Comment Created
For a complete list, check out the Trigger Node documentation.
In this example, I'm using "Issue Created" for the Gyu07/giselle-test repository. Once configured, click Enable to activate the trigger.
Step 2: Processing Issue Data with a Generator Node
When an issue is created, the Trigger node outputs the issue's title and body. We can pass these to a Generator node for processing.
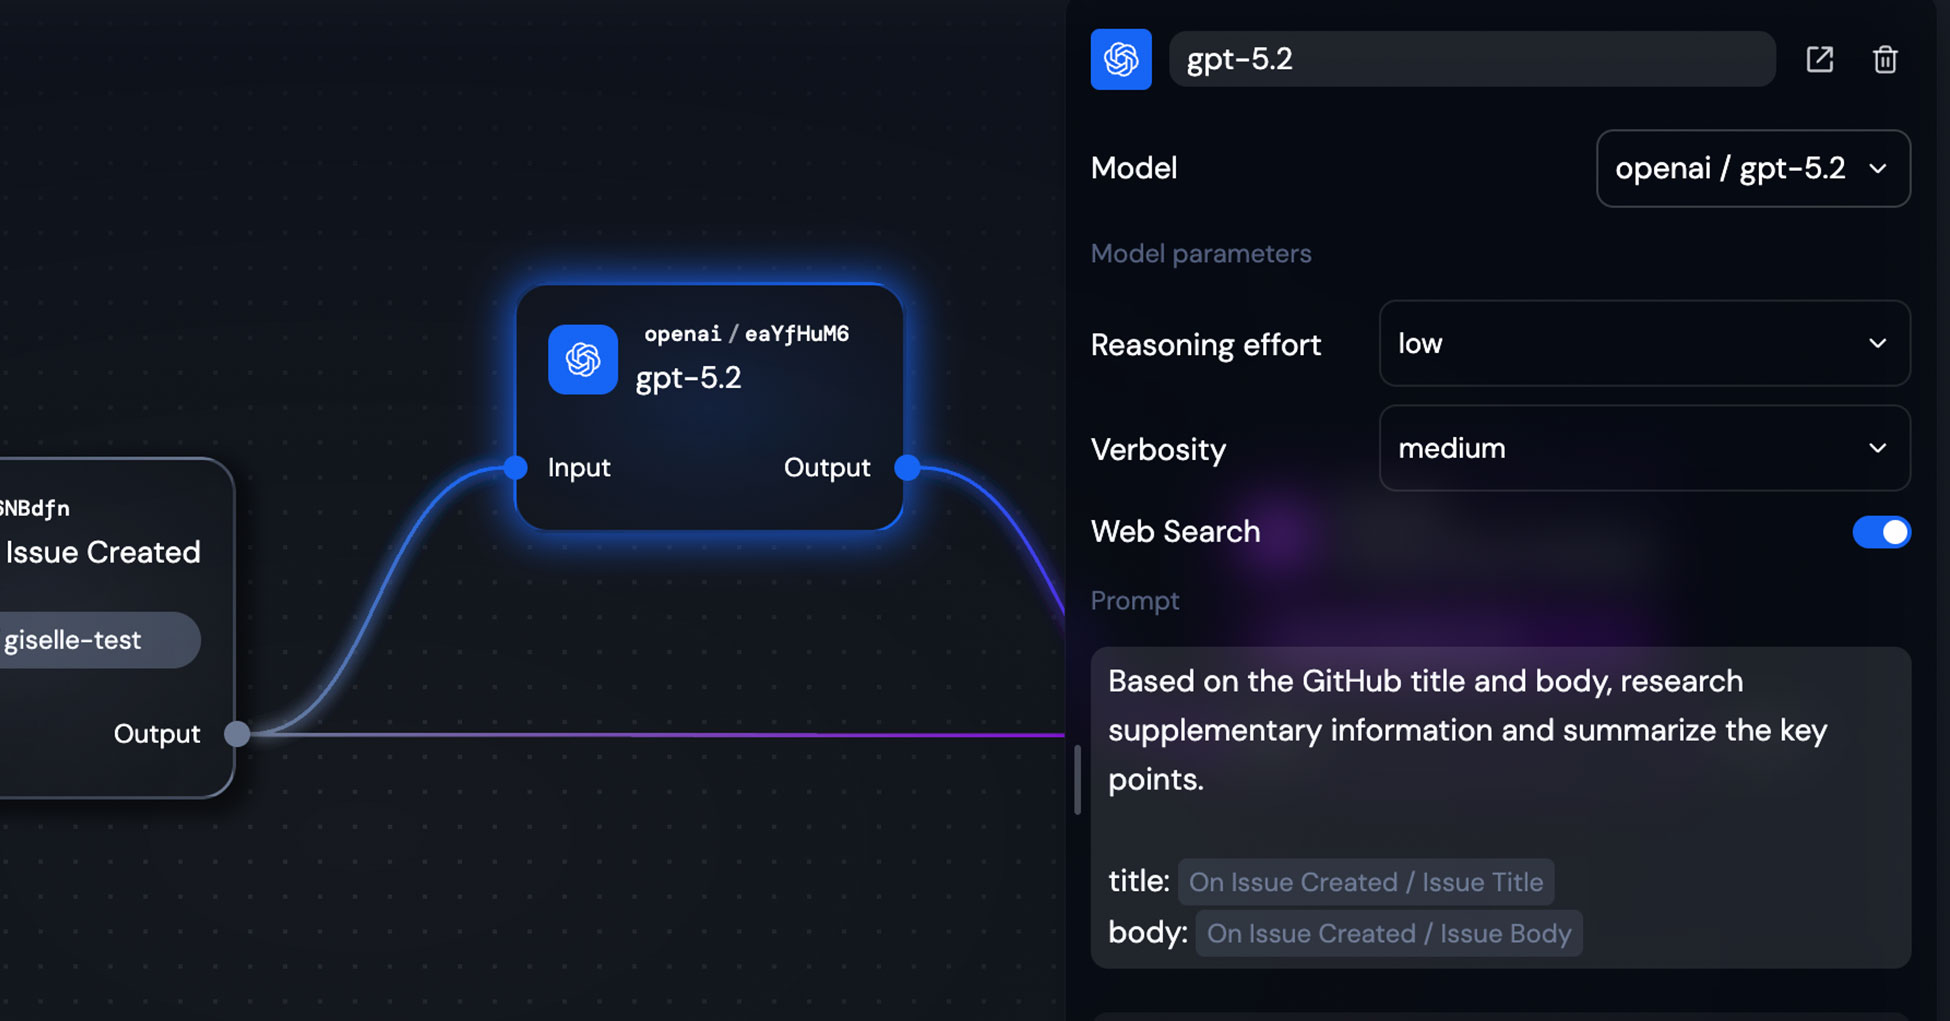
Here's how I configured the Generator node:
- Model: OpenAI gpt-5.2
- Reasoning effort: Low
- Verbosity: Medium
- Web Search: Enabled ✓
The prompt is straightforward:
Based on the GitHub title and body, research supplementary information and summarize the key points.

title: {{On Issue Created / Issue Title}}
body: {{On Issue Created / Issue Body}}
Notice how we're using template variables ({{On Issue Created / Issue Title}}) to dynamically inject the trigger's output. This is the key to making your workflows reactive to real events.
With Web Search enabled, the model will actively research relevant information based on the issue content—perfect for providing context that the issue author might not have included.
Step 3: Adding the Action Node to Post Comments
Now we need to send the AI's response back to GitHub. Add an Action node and configure it to create an issue comment.
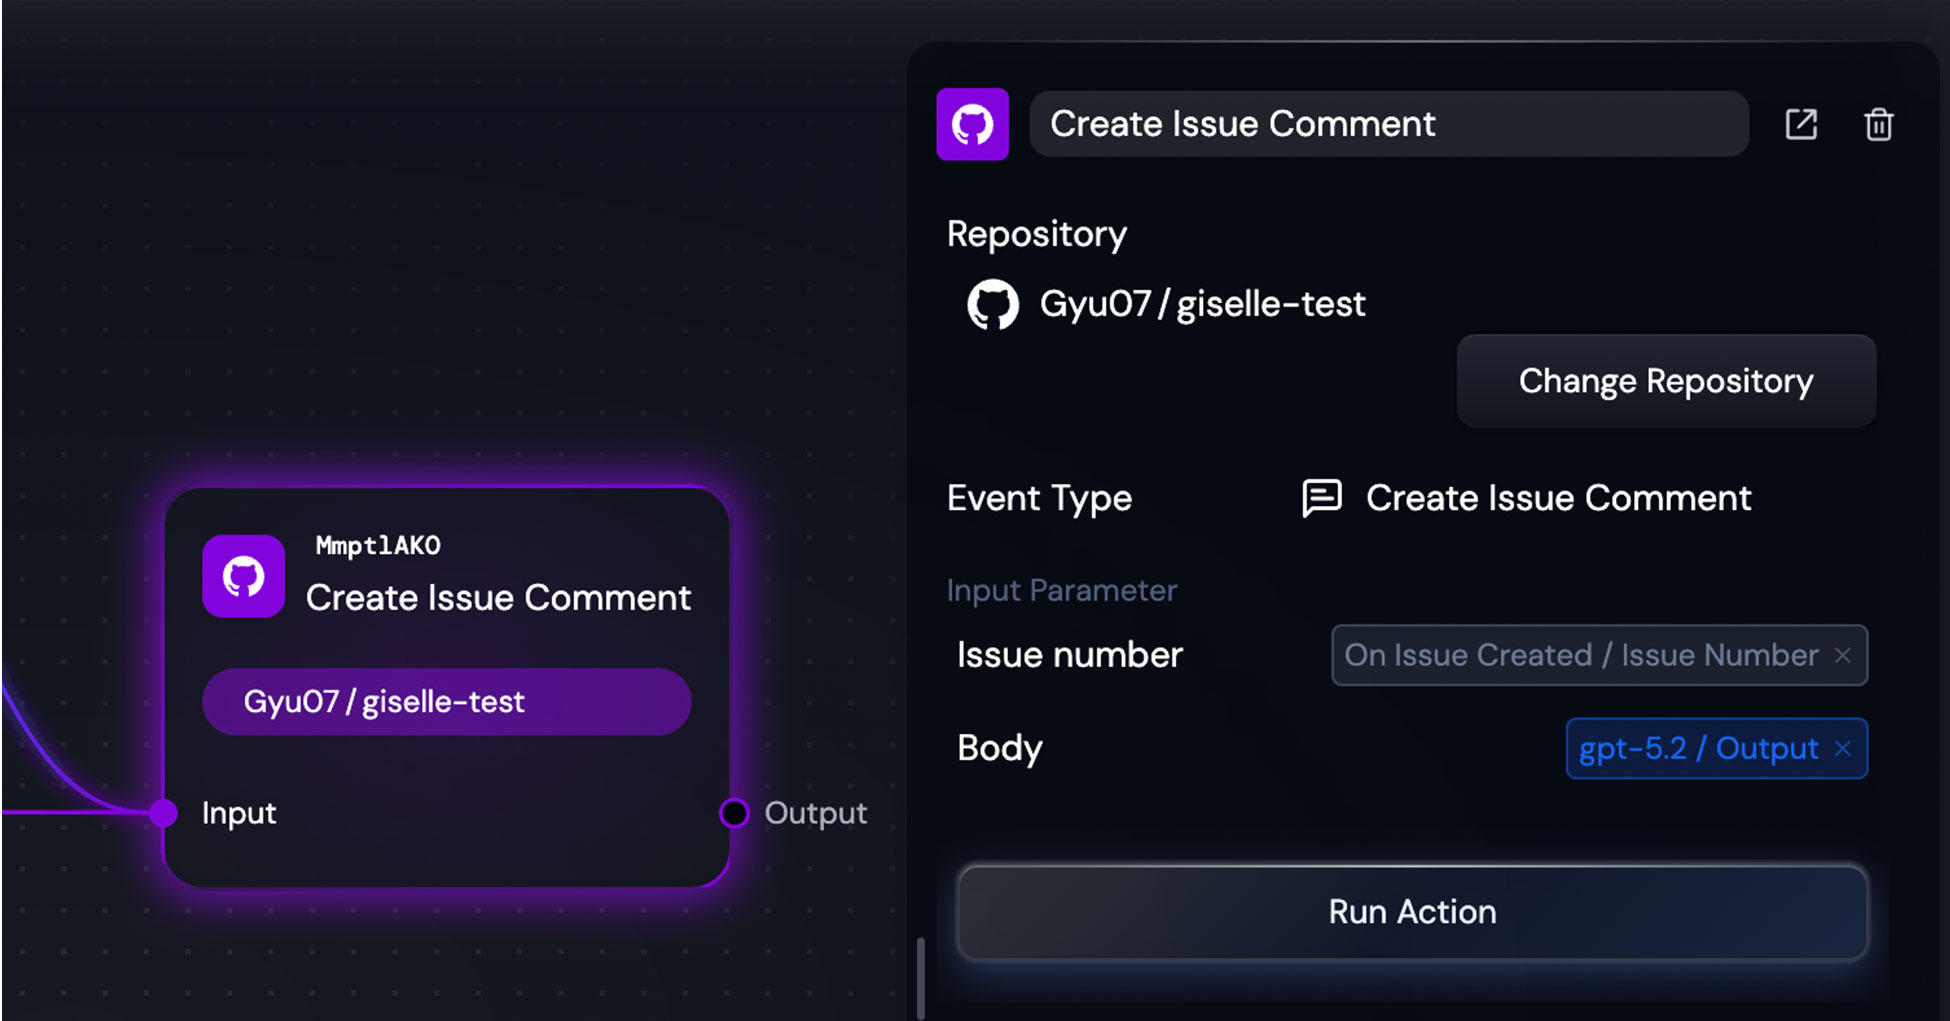
The configuration:
- Repository:
Gyu07/giselle-test - Event Type: Create Issue Comment
- Issue number: Sourced from
On Issue Created / Issue Number - Body: Sourced from
gpt-5.2 / Output
This is where the magic happens. The Action node takes two dynamic inputs:
- The issue number (so it knows where to comment)
- The generated text (the content of the comment)
For more on what Action nodes can do, see the Action Node documentation.
Step 4: Testing Your Workflow
Before enabling the workflow for real events, you can test it with dummy data. Click the Run button in the top-right corner.
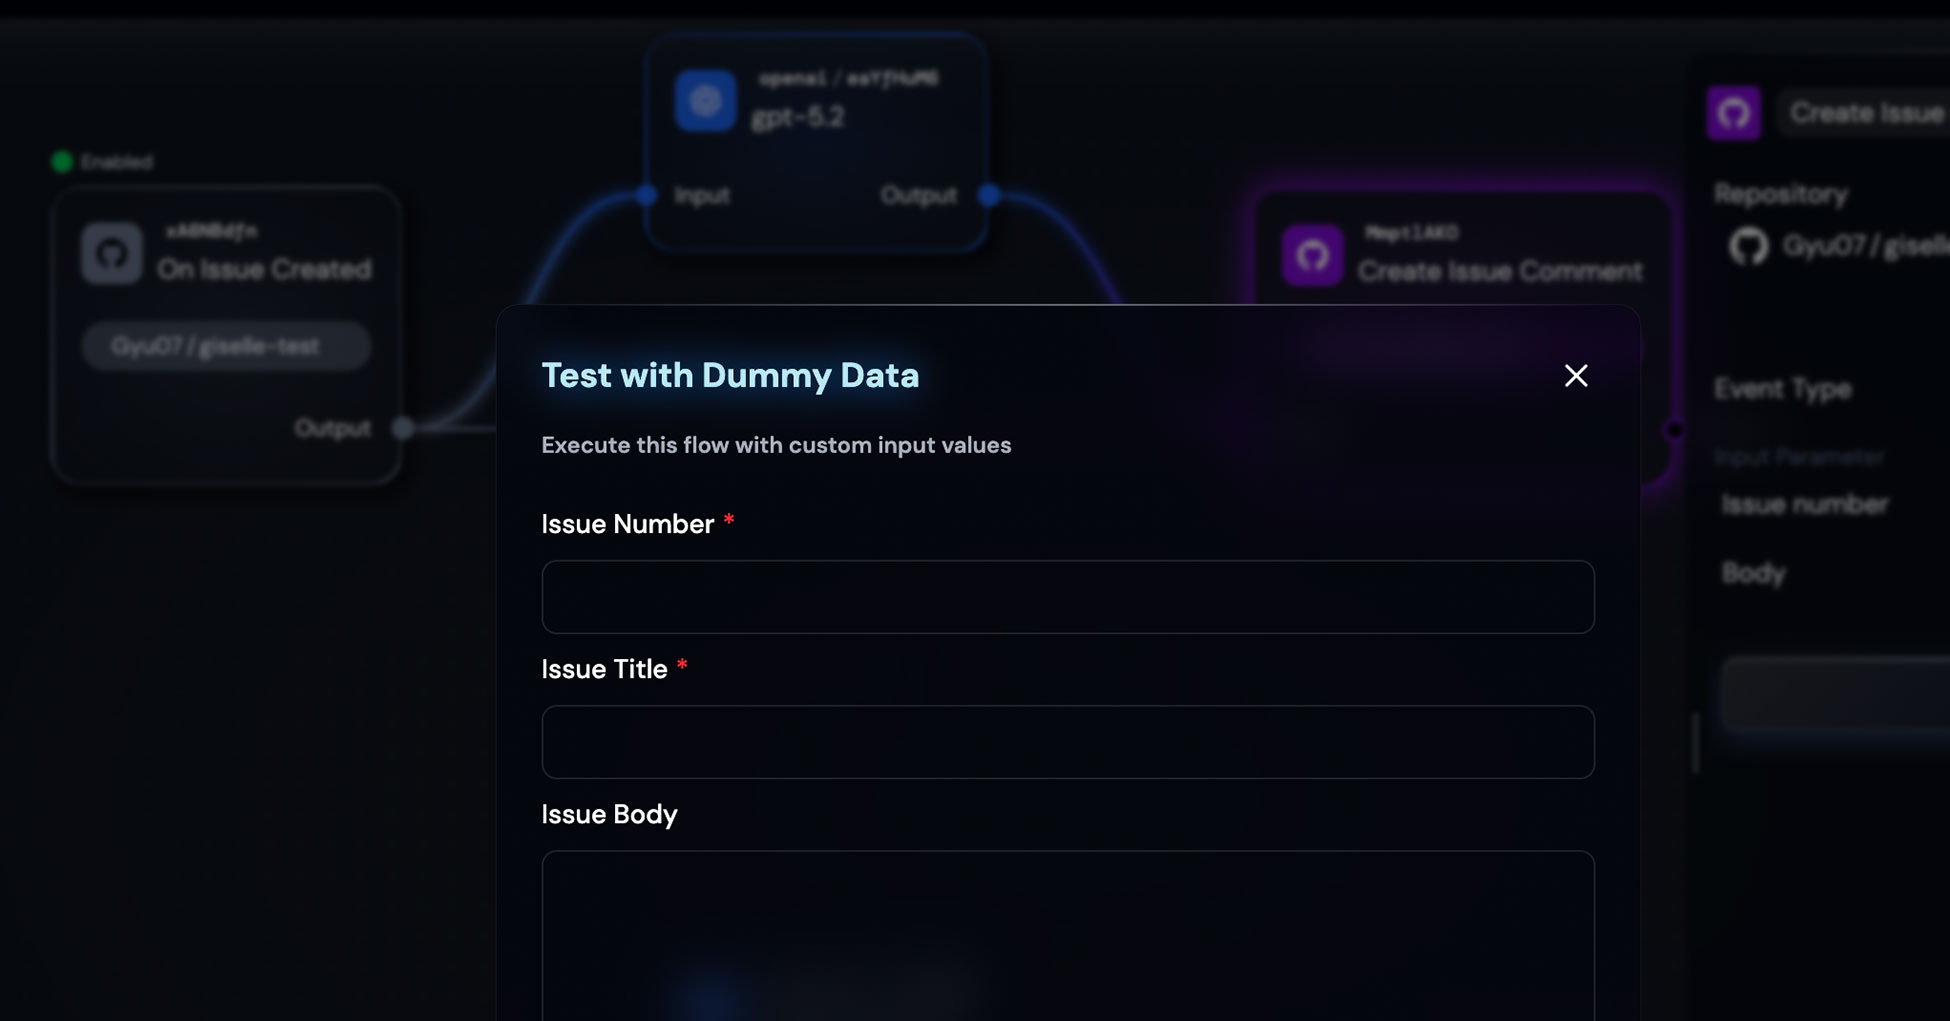
A modal will appear where you can input test values:
- Issue Number: Any number (e.g., "1")
- Issue Title: A sample title
- Issue Body: Sample issue content
This lets you validate your entire workflow end-to-end without waiting for actual GitHub webhooks.
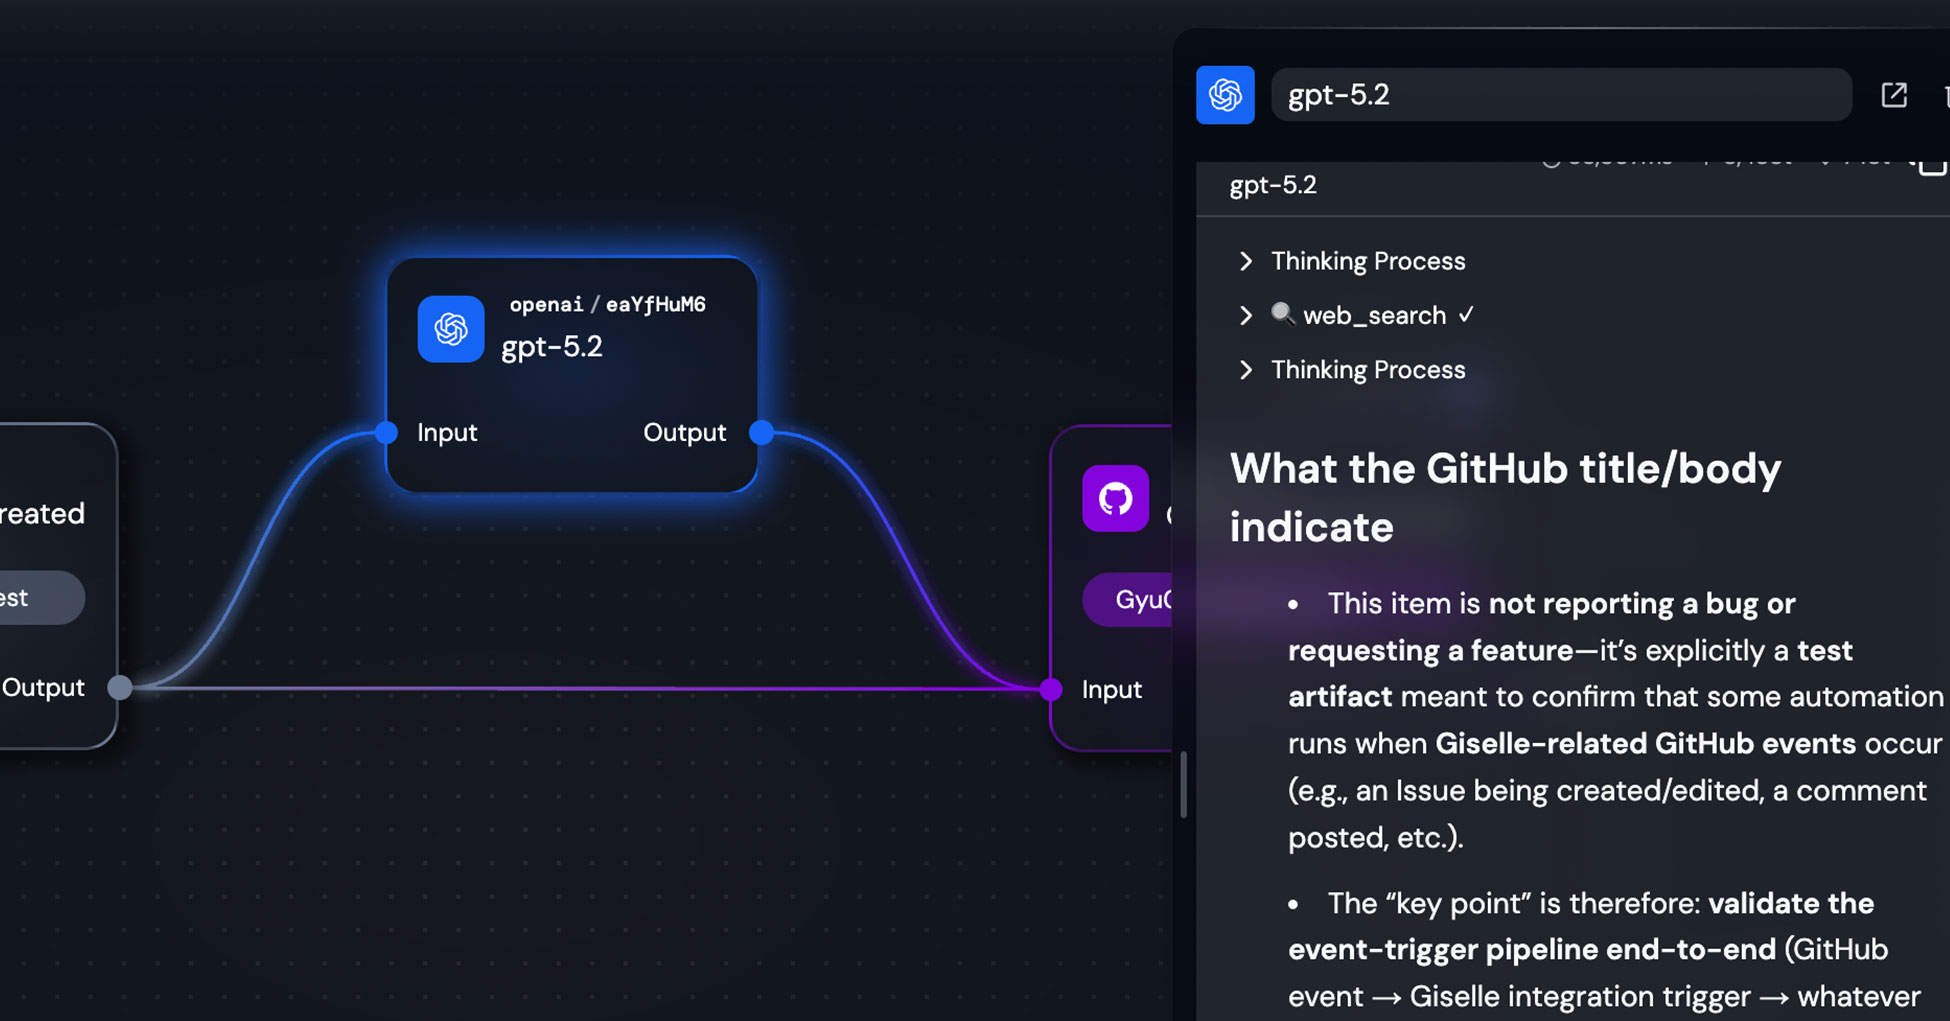
In my test, the gpt-5.2 model correctly identified that the issue was a test artifact (not a real bug report) and provided contextual information about how Giselle's GitHub integration works.
Seeing It in Action
Let's see what happens when a real issue is created.
When someone opens an issue in the monitored repository, the Giselle bot immediately responds. You'll see a 👀 emoji reaction indicating the workflow has been triggered, along with a progress indicator showing each step:
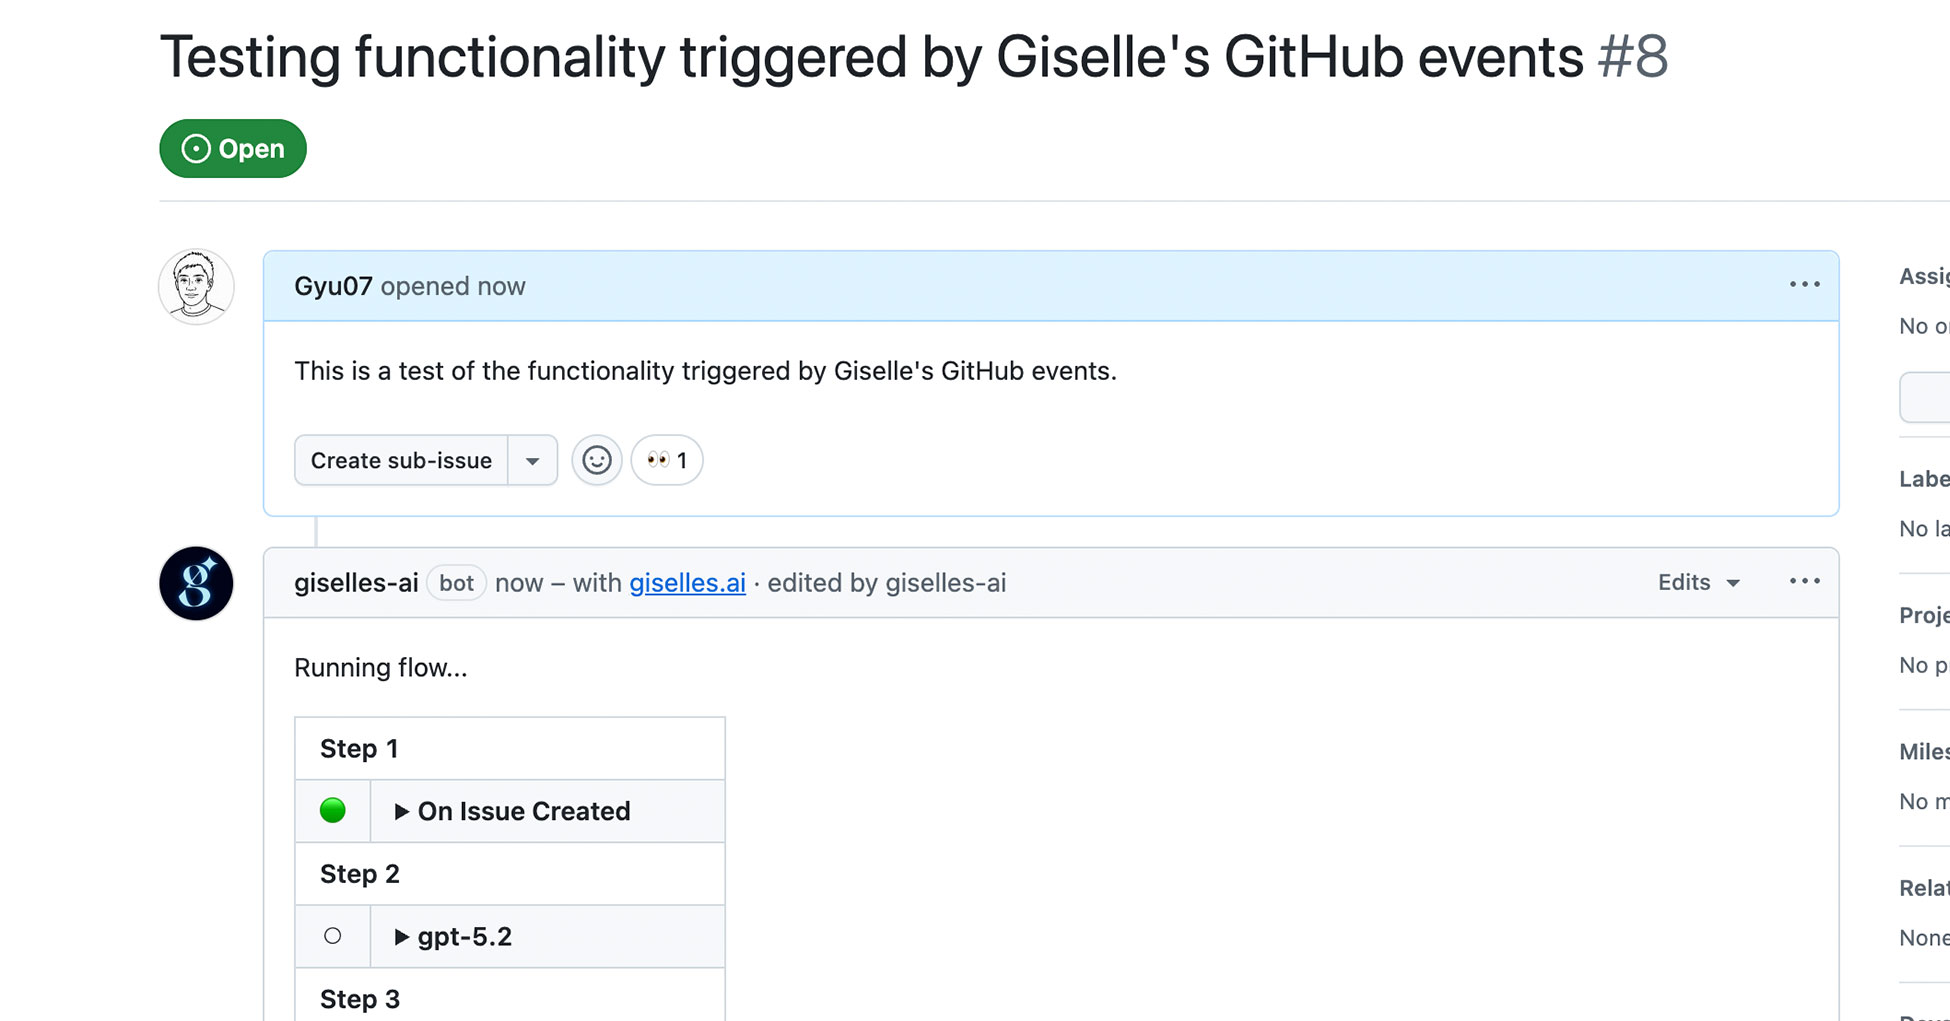
- Step 1: On Issue Created ✓
- Step 2: gpt-5.2 (processing)
- Step 3: Create Issue Comment
Once complete, the AI's analysis appears as a comment:
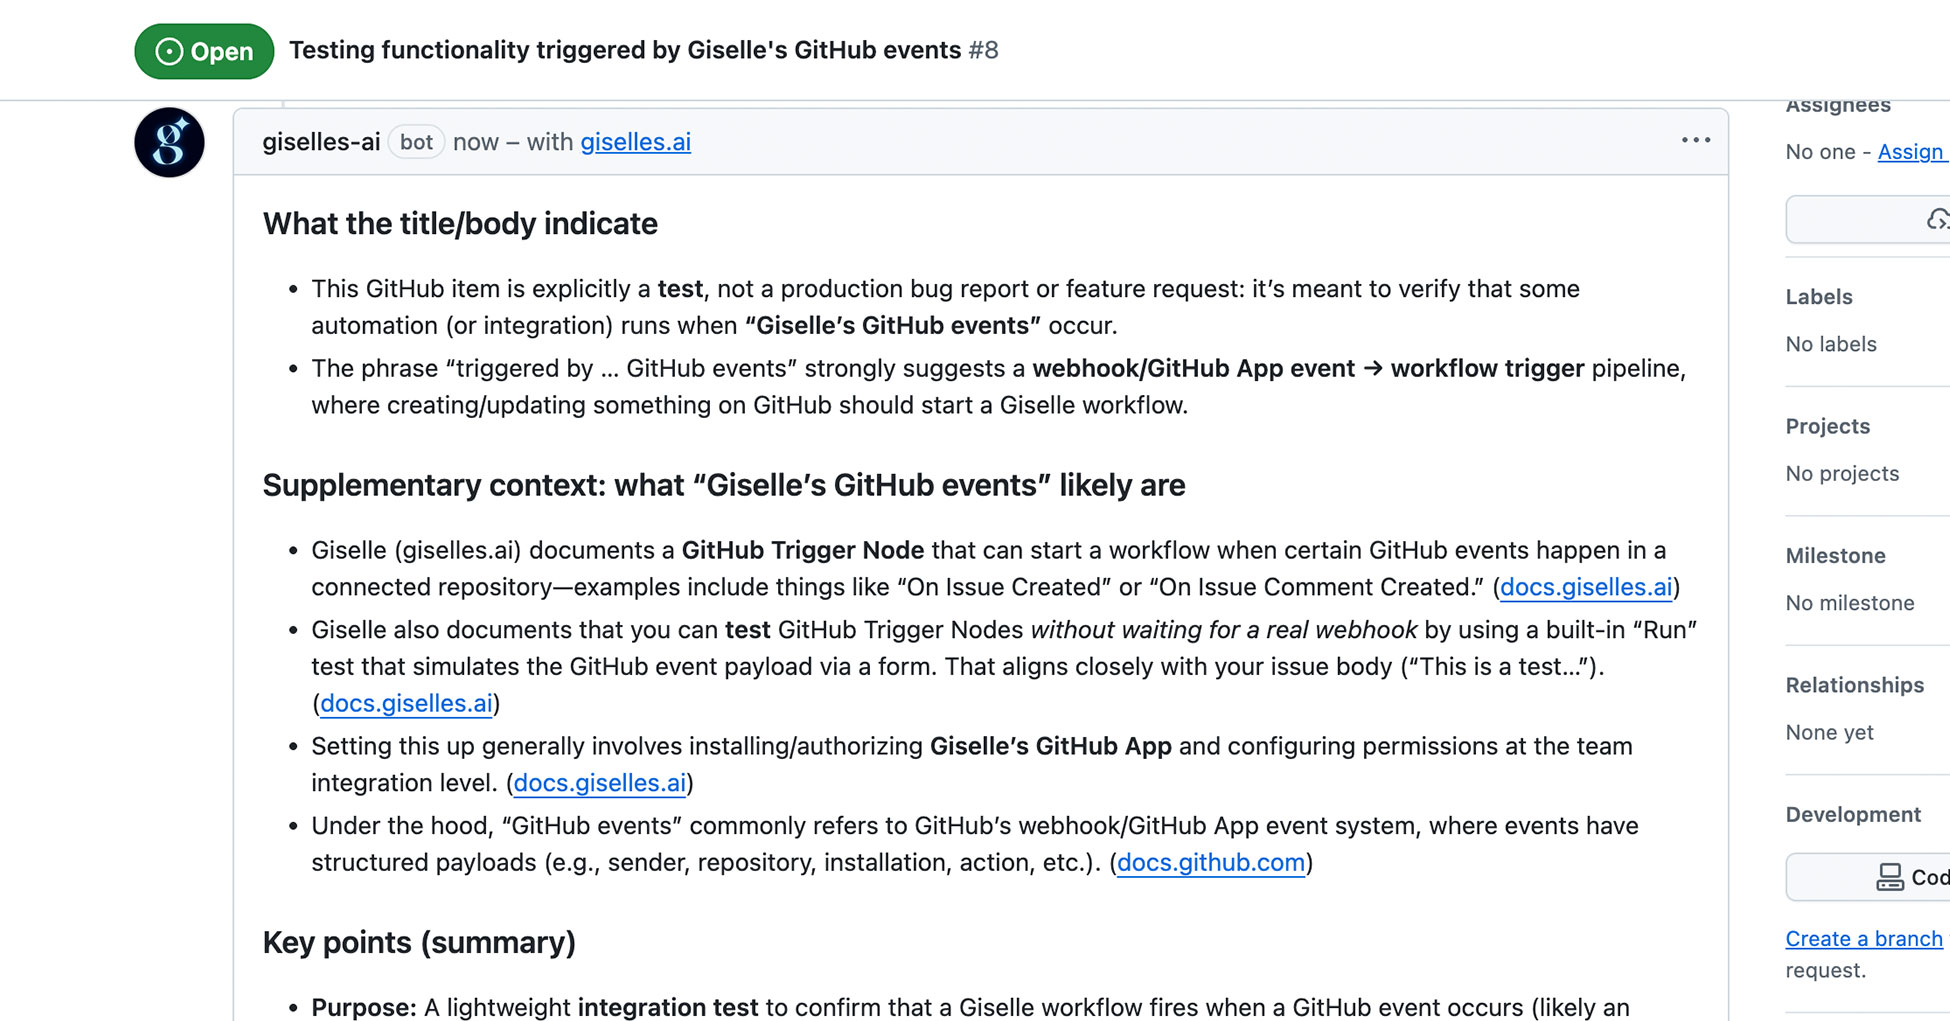
The response includes:
- Analysis of what the issue is about — The model correctly understood this was a test, not a bug report
- Supplementary context — Information about Giselle's GitHub Trigger Node and how it works
- Key points summary — Actionable takeaways
All of this happened automatically, within seconds of the issue being created.
Going Further: Callsigns and Labels
What we built is just the beginning. Giselle's Trigger nodes support more sophisticated activation conditions:
Callsigns: For comment-based triggers, you can specify a "callsign"—a specific command that must appear in the comment for the workflow to activate. For example, setting /research as a callsign means the workflow only runs when someone comments /research [their question]. This prevents the workflow from running on every single comment.
Labels: For label-based triggers (Issue Labeled, Pull Request Labeled), you can specify which labels activate the workflow. Multiple labels work as an OR condition—if any of the specified labels are added, the workflow runs.
These features let you build workflows that activate only when you need them, at exactly the right moment.
Wrapping Up
Event-driven workflows open up a whole new dimension of what you can automate with Giselle:
- Issue triage bots that categorize and enrich new issues
- Code review assistants (like CodeRabbit) that analyze PR diffs
- PRD generators that turn feature requests into structured documents
- Documentation updaters that respond to code changes
And remember: combine these triggers with GitHub Vector Store to give your workflows deep knowledge of your codebase. That's when things get really interesting.
The workflow we built today took about 15 minutes to set up. No code. No infrastructure. Just connect the nodes, configure the parameters, and enable.
Give it a try—I'd love to hear what you build.